Who deserves a special day more than Mom? Mother's Day is the one day where moms (hopefully) will be thanked for everything they do for their children and families. As a mom myself, I love flowers, special dinner out, and not having to do dishes, but what I treasure most are the little homemade cards my daughters so proudly produce. These are the best reward! Hand-made gifts from the heart are always more meaningful than purchased ones. Here I've collected a few little crafts that can be used for Mother's Day or any spring gift.
Photo Flower Gift Bouquet

This is an idea I thought of during the Easter season when I needed a good craft idea for my daughter's kindergarten class to give to the principal. All you need is a plant (I used a Mum in a basket but you could use any plant/flower in a pot), photos that you would like to display, some craft foam, craft glue, a hot glue gun, and skewers. I used wooden shish-kabob skewers but you could use thin craft dowels or even chop sticks.
I used a 2" circle craft punch to cut out each of my daughter's classmates' photos. We had each child decorate a foam easter egg. I bought a foam Easter egg craft kit at Michaels but you could cut out your own flower/heart/circle from foam to mount the photo on. Make two of the same shape.
Glue the photo to one of the foam shapes. Place it face down on a counter. Place the skewer on top of the shape and apply hot glue to the entire surface liberally. Quickly put the other shape on top to make a 'sandwich'. Hold until the hot glue cools.
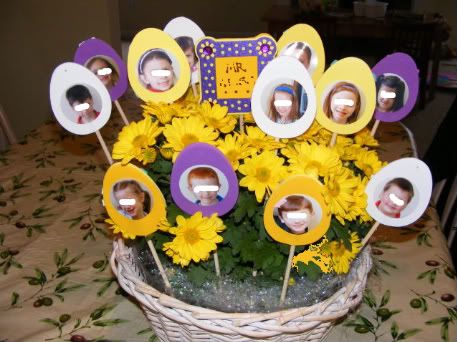 I have deleted my daughter's principal's name for the blog but I made a little 'card' for this gift by taking an inexpensive wooden frame (again, from Michaels) and doing the same foam 'sandwich'. I added a message with a Sharpie marker. An easy gift but it makes such a great display that a variation could be used as a centerpiece for a wedding or shower, for a goodbye gift for a leaving co-worker, or for Mom or Grandma for Mother's Day!
Tissue Box Photo Album
Not only is this a cute idea that any Mom or Grandma would love, but it is a GREEN gift!
You will need:
square facial tissue boxes
-White glue
-Paper clips
-Ribbon
-Scissors
-Hole punch
-Pencil or pen
1) Carefully pull apart the sides of each box so it lies flat. Make sure the opening in the box is right side up. Carefully remove any plastic that may be glued around the oval opening.
2) Cut around the square top and side of box to form a small picture frame (see below). Glue the two sides of the frame shut but leave the top open to slide a picture in. Use paper clips to hold the cardboard together while the glue dries (see second photo below). Make at least 5 picture frames for your album.
3) To make a front and back cover, cut four squares from the remaining sides of the boxes. They should be the same size as your album pages. Glue two squares together, print side out, for the front. Repeat for the back cover. Use paper clips to hold the cardboard together while the glue dries.
 4) Stack the covers and album pages together in the order you want them to be. Punch two holes in the left side of the cover page. Use a pencil or pen to mark where to punch the holes in the next page (see below). Continue until all the pages have holes.
 5) Thread a ribbon through the pages and you have a little book! Make it extra special by slipping a picture of you or a little greeting into the first the first page.

Facial Tissue Travel Holder
I bought one of these handy tissue holders a few years ago at a craft show and always thought to myself, "These look so easy- I need to figure out the measurements so I can make more!" So...here it is!
Directions:
1) Cut your fabric 8" long by 5.5" wide. Using 3/8" seam allowances, sew both of the short ends (see below).
2) Fold one of the short ends up 2", so the right sides of the fabric are touching (see below).
3) Fold the other side in 2" as well. It will overlap the first side. Pin along edges. Sew, flip right-side-out and insert a pack of travel facial tissues.

This makes an inexpensive, very quick project you can whip up in literally 5 minutes. These would be great for wedding/baby shower party game prizes, gifts for teachers, stocking stuffers, etc.
Sunflower Cupcakes
Creativity runs in my family! I wanted to share these adorable cupcakes my mom made for Easter. But I wanted to share them because they were so easy to make. Start with yellow icing (my mom just used a plastic zip-top baggie with the corner cut off) and begin to pipe little 'petals' around the edge of the cupcake. Once you've gone around once, make another layer closer to the middle. When you've gone almost all the way into the middle, add a few mini chocolate chips for the sunflower 'seeds' to complete! My mom used lemon cake (and a little lemon extract for the frosting) and they were delicious! My mom made these for me and my family, but I bet your mom would love it if you made them for her for Mother's Day. :)
If you are looking for craft ideas for your children to help you make (for Grandma or another Motherly figure) there are many sites online with great ideas. Feel free to share the links with Dad if you find something you'd like! Ha-ha!
http://www.mothersdaycentral.com/mothers-day-crafts/
http://crafts.kaboose.com/holidays/mothers-day/
http://familyfun.go.com/mothersday/
http://www.apples4theteacher.com/holidays/mothers-day/
I'm wishing all of my Mom friends a blessed Mother's Day!


Awesome Rachel! I LOVE the tissue photo album. I might have to go search the house for some boxes. haha!!!
ReplyDelete