Friday, May 15, 2009

Saving Money on Groceries

Over the years I have learned to save a lot on my grocery bill-- I figured this might not be the 'craftiest' blog but I'd love to share so others can have the satisfaction of saving their hard-earned money!

I've always been a saver. I can remember being a kid and saving up my weekly allowance and birthday money for something big. But it wasn't until I was a newly-wed finishing school, and then when I was a new mom who chose to stay home with my first baby, that I really needed to save money on daily necessities. Sundays I would sit at the kitchen table marking all of the weekly sales and I would clip coupons. I knew which stores doubled coupons, which stores matched other stores' prices, etc. The past few years I have even printed coupons out online in addition to the Sunday paper insert. If I spent $100 on groceries I would probably save between $20-30 in sales/coupons, $40 on a good week. Thirty percent on average, I thought, was good!

Over Easter weekend I read this book by Terri Gault. She is the creator of The Grocery Game .
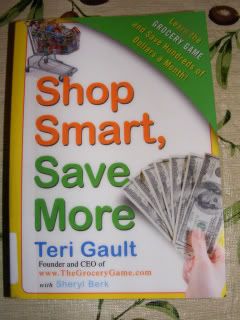

Photobucket

I had heard about the Grocery Game before but thought, "I am already saving a lot... was there really more I could possibly be doing to save my family money?" Turned out I was wrong! Since reading this book and implementing some of Terri's techniques I have saved between 50-70% on every shopping trip. I wouldn't have believed it before I saw my first receipt. And the best part is I am still playing the Grocery Game and think I will continue to get better at it!

Let me back up a little...

What is the Grocery Game?
The Grocery Game is a website that was created by Terri Gault, to help others save on groceries, cleaning supplies, and toiletries each month. Terri's 'game' is to purchase items while they are on sale plus you have a coupon, which further increases savings. That way, you will never have to buy anything at regular price. The website posts store lists of items going on sale plus the coupons offered to show you what to buy that week. A big part of the game is to stock up about 3 months of most things you use, because stores usually put items on sale on a 12 week rotation. So if you go through a box of cereal a week, and they are on sale plus you have coupons, you would purchase 12 boxes. That way you wouldn't have to purchase your cereal when it is full price if it doesn't go on sale again for a few months. Terri has numerous testimonials of people who said their refridgerators, freezers, and pantries were bursting at the seams plus they were spending much less per month.


For me, I feel that 3 months is a little excessive sometimes-- you have to take into account seasonal items, the expiration date, and the size of your pantry/freezer before you go out and buy 20 pounds of ground beef or 12 boxes of cereal. If you are able to add some shelves in the basement or garage for an extra pantry, and you are sure you will eat it before it goes bad, then you probably will save some money. But even with a large pantry, when Frosted Flakes went on sale plus with coupons I could get it for under a $1 a box, I only bought as many as I had coupons for: 5. So take it with a grain of salt and do what works for you!

The book also claimed that you could save much more $$$ shopping at grocery stores, even if they were higher-end stores, because they usually have better sales than stores that claim to have 'everyday low prices' and do not have a weekly sales ad. This was opposite of what I had been doing; I had been shopping mostly at a Walmart Supercenter. But overall I have saved more shopping at other stores, like Terri Gault suggested. I do want to mention that Walmart pricematches, though: I have heard that some Walmarts in rural areas only require you to tell them that another place has it for a better price and they will match it; at my store they require you to take the flyer in and sometimes they will even keep it. They do not pricematch produce prices, other stores' brands, or sales that require you to purchase a number of items (like, 6 for $8). Another thing to keep in mind is that Walmart does not double coupons. I am fortunate that I have at least 3 other grocery store chains nearby, all which double and sometimes triple coupons, up to $0.50. So if I have a lot of $1.00 coupons it may be beneficial to go to Walmart; if most of them are small amounts under $0.50 it might save me more if I go to one of the other stores.

Terri Gault claims that you can get great deals on beauty/health and cleaning supplies at drugstore chains like CVS, Walgreens, or Rite Aid. I have not had as much luck with those stores but know many who do. One thing I have done in the past was to save those "Free $20 giftcard with new or transferred prescription" coupons, and saved it for when I needed to fill a script (then switch back/forth) . I would save those giftcards and buy toiletries with them. CVS does "Extra Bucks" that print out on your receipt for a future visit. Those can give up to $5 off $15 at a time, which is a 25% savings!


A few odds and ends of tips on savings:

-For large purchases, and clothing: keep an eye out for sales flyers for a few weeks even after you have made your purchase. Many stores will let you come back and get a price adjustment afterward if you see it go on sale for less than you paid. Every store varies: some policies are 7 days, some 2 weeks and others up to 30 days.

-If you see something on sale but they are out of the product, ask the cashier if that store gives rainchecks. I get rainchecks very frequently. Rainchecks extend the sale to you, for the next time you shop there, even if the sale is no longer in effect. Most rainchecks are good for 14-30 days. Walmart does not give rainchecks.

- AllYou is an inexpensive magazine similar to Woman's Day. It is owned by Walmart and sold only in their stores, however you can order a subscription at www.allyou.com . I believe www.amazon.com has an even better deal per issue. The magazine is very inexpensive at $1.25-$1.99 each. I have been purchasing them for a year or so and they always pay for themselves because they have great coupons inside. Many of their coupons are 'Buy one get one free', some offer free items without any other purchase. Many are good only for Walmart but many can be used at other stores.

-Entertainment and Gold-C books can save you a lot. Not only does the purchase support your local school/girls scout troop/etc but I always make back what I have paid within a month or two. They are usually good for a year. I keep my Entertainment book in my car glove box so I always have it when I might need it. Sometimes when we want to eat out but don't know where, we will search for places in the book, where we can eat at a discount. This year my book even has a number of $5 off $50 coupons for one of my local grocery stores.

-Request a subscription of Kraft Food & Family magazine. It comes 4 times a year and is full of tasty, easy, and money-saving recipes, plus it always contains a number of coupons. Best of all it is free, plus they have online coupons at www.kraftfoods.com

Being as thrify as I am, I had a problem even paying the few dollars a week or month for the Grocery Game. So I searched around online and found a few other websites which basically do the same thing, only for free.


Here are some of the best savings I have made since I changed my buying habits:
Photobucket
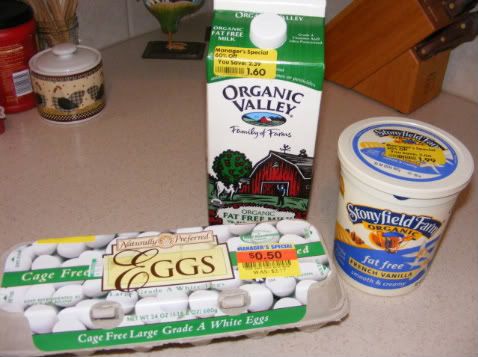
-Cage Free brown organic eggs on markdown. They were $2.77 regularly; marked down to $0.50.
-Organic Valley 1/2 gallon of milk. Regularly $3.99 marked down to $1.60. I had a $1 off coupon = $0.60! There were still 10 days left until expiration when I bought it.
-Stonyfield organic fat-free vanilla yogurt 32 oz. Regularly $3.99 marked down to $1.99 plus I had a $0.50 coupon. It was triple coupon day up to $0.75 so I got the yogurt for $0.49! And it still had a week until expiration.
Some others not pictured:
-KROGER Oscar Meyer bologna $1 each ($2 for 2)- plus an online printable $1 off 2 coupon = $0.50 each
-KROGER Clean & Clear foaming facewash 18 oz- regularly $5.29 marked down to $1.29, plus a $1.00 coupon = $0.29!
-WALMART Kraft Macaroni & Cheese crackers 'rolled back' to $1.00- plus a $1 coupon = FREE
-WALMART Kraft Original BBQ sauce 18 oz. Regularly ~$1.50. On sale for $1 plus a $1 coupon = FREE
-WALMART Kraft Salad Dressings 16 oz. Regularly ~$2.50. On sale for $1.58 plus a $1.50 coupon = $0.08 each
-MEIJER Hunt's Ketchup 24 oz., on sale for $1 each- plus a $0.35 coupon doubled = $0.30 each


Websites that offer free printable coupons:
Coupons.com
Eversave
PP Gazette
Coupon Mom
Everyday Eating
Very Best Baking
A Full Cup
Stonyfield Farm Request for coupons via mail
Hot Coupon World
Thrify Fun
The Grocery Game

I hope that some of you have as much luck as I do if you try out this method of shopping! The way I see it, you don't really have much to lose by trying. You might be pleasantly surprized. I'd love to hear from you if you decide to try the 'grocery game' (or your own version of it) and what your best deals were :)

Thursday, May 14, 2009

Children's Gardening

Kids of all ages love to dig in the dirt and make a mess! Gardening is great because it can teach us about our environment and how things grow. And not only will you be teaching your children about hard work, patience, and responsibility, your child will love the quality time you spend with them- I bet you will enjoy it too!


Photobucket


Where to Start?

First, you need to decide what kind of garden you want to start. Here is a cute link to help you: My First Garden . Your garden doesn’t need to be large! In fact, if it’s your first year of gardening with your child (or on your own) then it probably isn’t a good idea to take on responsibility of a 10x12 foot garden! Small is best to start with; you could even start out with a few pots.

Once you decide what kind of garden you want to make, and how big to make it, you can prepare your soil. I posted a blog a while back about garden preparation: Craft, Home, and Garden with Rachel


How do you get your child excited about gardening? I will quote from http://www.kidsgardening.com/ because I like their answer so much.


A few things that I would add:
  • Purchase or check books out of the library about gardening and read them together.

  • Let your child draw a picture of his/her plants on a 3x5 card. Laminate it and attach it to popsicle sticks for row markers.

  • Purchase child-sized garden tools for your child to use- they can be found inexpensively at many stores.

  • Plant vegetables that your child likes to eat—easy way for them to get involved and learn where some of their food comes from.

  • See if there is a local Children’s garden nearby. We have one here in Michigan, that I would love to take my girls someday: Michigan 4-H Children's Garden . If you do visit, see what your child is drawn to and enjoys the most- maybe you could incorporate some of those plants into your own garden.
    • Getting Ready to Plant

      How to Design a Children's Garden

      You can start growing your seeds directly in the ground, or in small containers. You don’t need to buy a fancy seed-starter kit. An empty coffee can, ice-cream container, milk carton, or even a paper cup would do. Drill holes in the bottom so the water can drain.

      Soak your seeds overnight so they will sprout more quickly- but don’t do it until you are ready to plant them. Once they are wet they shouldn’t be allowed to dry out. If you plant them in the ground, make sure you read the instructions on your seed packet to see how far apart to plant them and how deep in the soil you should bury them. If you start them in a small container inside, put them in a sunny spot. Once they start sprouting, thin your plants if they are too tightly grouped (less than 1 inch apart). This gives the rest more room to grow. Most seed packets will tell you when to plant them in the ground outside, but usually it is when they are about 3 inches high (about 2 weeks after you have planted the seeds).

      One of the easiest plants to grow from seed is the sunflower. You don’t need much space to grow one; you can even grow one in a pot! They will be happy in a sunny spot in a pot with some Miracle Gro potting soil. There are 67 varieties but the big Mammoth one is very fun with kids as it can get up to 10 feet tall! Here is a link for successful sunflower growing:
      Tips on How to Grow Sunflowers from Seed

      Photobucket

      Themed Gardens for Children

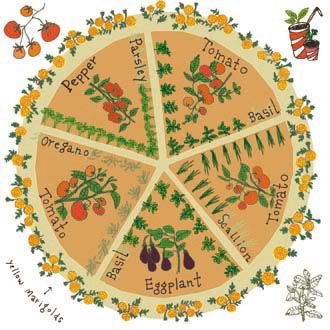
      • Pizza Garden: You could make your garden round, then plant tomatoes, onions, peppers, and a variety of different herbs. You could even plant some white or yellow flowers to represent cheese (see below).

      • Pizza Garden

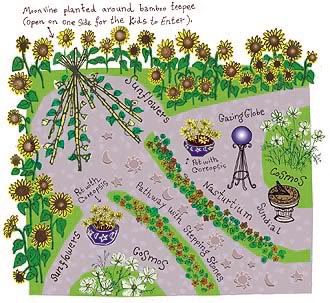
      • Sun and Moon Garden: plant Sunflowers, Coreopsis, Cosmos, Nasturtium, and Moon Vine (See below).

      moon garden

      • Petting Zoo Garden: Zebra Grass, Spider Flower, Lion’s Tail, Cockscomb, Catmint, Snapdragon, Lamb’s Ear, Hens & Chicks

      • Rainbow Garden: Arch shaped garden with rows of different colored flowers

      • ABC Garden: choose one plant for each letter. This would take up a good amount of space- you could do gardening by the foot (divide your space in 1x1 foot squares; Plant one flower/plant in each square foot). You would need 26 squares, one for each letter.

      • Butterfly Garden: Purple Coneflower, Butterfly Bush, many other butterfly-attracting flowers

      • Nose Garden: Choose fragrant plants

      • Cinderella Garden: Plant pumpkins and Lady Slippers

      Older Kids

      • Historical Garden: Choose a time in history and research plants for that period

      • Native American Garden: Corn, Beans, and Squash

      • Surprise Garden: Plant a variety of seeds and let your children identify each plant


      Here are two online Children's garden plans:

      Bordine's Child's Garden
      Better Homes and Garden’s easy children’s vegetable garden plan

      Books on Children's Gardening:

      Ready, Set, Grow!
      Kids Gardening
      The Ultimate Step-by-Step Kids' First Gardening Book
      The Christian Kids’ Gardening Guide
      A Backyard Flower Garden for Kids

      Have fun!!! :)
      Wednesday, May 6, 2009

      Mother's Day Miscellaneous

      Who deserves a special day more than Mom? Mother's Day is the one day where moms (hopefully) will be thanked for everything they do for their children and families. As a mom myself, I love flowers, special dinner out, and not having to do dishes, but what I treasure most are the little homemade cards my daughters so proudly produce. These are the best reward! Hand-made gifts from the heart are always more meaningful than purchased ones. Here I've collected a few little crafts that can be used for Mother's Day or any spring gift.


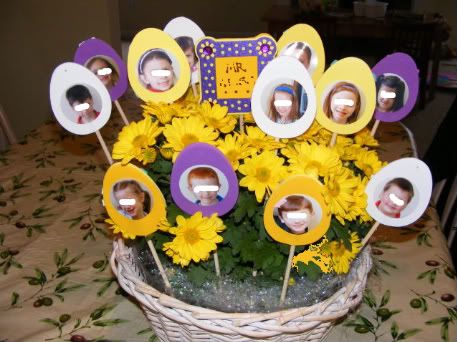
      Photo Flower Gift Bouquet

      This is an idea I thought of during the Easter season when I needed a good craft idea for my daughter's kindergarten class to give to the principal. All you need is a plant (I used a Mum in a basket but you could use any plant/flower in a pot), photos that you would like to display, some craft foam, craft glue, a hot glue gun, and skewers. I used wooden shish-kabob skewers but you could use thin craft dowels or even chop sticks.

      I used a 2" circle craft punch to cut out each of my daughter's classmates' photos. We had each child decorate a foam easter egg. I bought a foam Easter egg craft kit at Michaels but you could cut out your own flower/heart/circle from foam to mount the photo on. Make two of the same shape.

      Glue the photo to one of the foam shapes. Place it face down on a counter. Place the skewer on top of the shape and apply hot glue to the entire surface liberally. Quickly put the other shape on top to make a 'sandwich'. Hold until the hot glue cools.

      I have deleted my daughter's principal's name for the blog but I made a little 'card' for this gift by taking an inexpensive wooden frame (again, from Michaels) and doing the same foam 'sandwich'. I added a message with a Sharpie marker. An easy gift but it makes such a great display that a variation could be used as a centerpiece for a wedding or shower, for a goodbye gift for a leaving co-worker, or for Mom or Grandma for Mother's Day!

      Tissue Box Photo Album


      Not only is this a cute idea that any Mom or Grandma would love, but it is a GREEN gift!

      You will need:
      square facial tissue boxes
      -White glue
      -Paper clips
      -Ribbon
      -Scissors
      -Hole punch
      -Pencil or pen

      1) Carefully pull apart the sides of each box so it lies flat. Make sure the opening in the box is right side up. Carefully remove any plastic that may be glued around the oval opening.

      2) Cut around the square top and side of box to form a small picture frame (see below). Glue the two sides of the frame shut but leave the top open to slide a picture in. Use paper clips to hold the cardboard together while the glue dries (see second photo below). Make at least 5 picture frames for your album.

      3) To make a front and back cover, cut four squares from the remaining sides of the boxes. They should be the same size as your album pages. Glue two squares together, print side out, for the front. Repeat for the back cover. Use paper clips to hold the cardboard together while the glue dries.

      4) Stack the covers and album pages together in the order you want them to be. Punch two holes in the left side of the cover page. Use a pencil or pen to mark where to punch the holes in the next page (see below). Continue until all the pages have holes.

      5) Thread a ribbon through the pages and you have a little book! Make it extra special by slipping a picture of you or a little greeting into the first the first page.


      Facial Tissue Travel Holder

      I bought one of these handy tissue holders a few years ago at a craft show and always thought to myself, "These look so easy- I need to figure out the measurements so I can make more!" So...here it is!

      Directions:
      1) Cut your fabric 8" long by 5.5" wide. Using 3/8" seam allowances, sew both of the short ends (see below).


      2) Fold one of the short ends up 2", so the right sides of the fabric are touching (see below).


      3) Fold the other side in 2" as well. It will overlap the first side. Pin along edges. Sew, flip right-side-out and insert a pack of travel facial tissues.


      This makes an inexpensive, very quick project you can whip up in literally 5 minutes. These would be great for wedding/baby shower party game prizes, gifts for teachers, stocking stuffers, etc.


      Sunflower Cupcakes


      Creativity runs in my family! I wanted to share these adorable cupcakes my mom made for Easter. But I wanted to share them because they were so easy to make. Start with yellow icing (my mom just used a plastic zip-top baggie with the corner cut off) and begin to pipe little 'petals' around the edge of the cupcake. Once you've gone around once, make another layer closer to the middle. When you've gone almost all the way into the middle, add a few mini chocolate chips for the sunflower 'seeds' to complete! My mom used lemon cake (and a little lemon extract for the frosting) and they were delicious! My mom made these for me and my family, but I bet your mom would love it if you made them for her for Mother's Day. :)


      If you are looking for craft ideas for your children to help you make (for Grandma or another Motherly figure) there are many sites online with great ideas. Feel free to share the links with Dad if you find something you'd like! Ha-ha!

      http://www.mothersdaycentral.com/mothers-day-crafts/

      http://crafts.kaboose.com/holidays/mothers-day/

      http://familyfun.go.com/mothersday/

      http://www.apples4theteacher.com/holidays/mothers-day/

      I'm wishing all of my Mom friends a blessed Mother's Day!

      Monday, March 9, 2009

      St. Patrick's Day Fun

      Here in Michigan, by March we are yearning for spring days! What better way to celebrate the anticipation of greener days to come than to have a little St. Patrick's Day party? Here are some fun crafts and ideas to try, perfect to make with your young children.


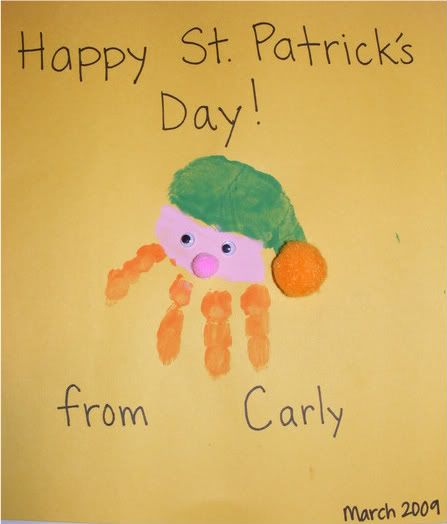
      Hand Leprechaun Greeting
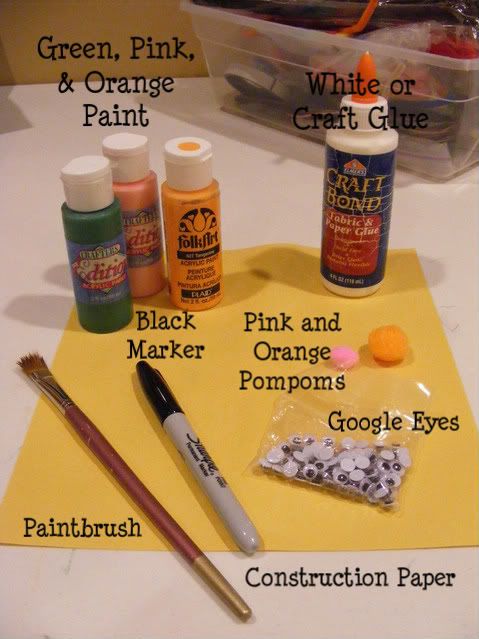
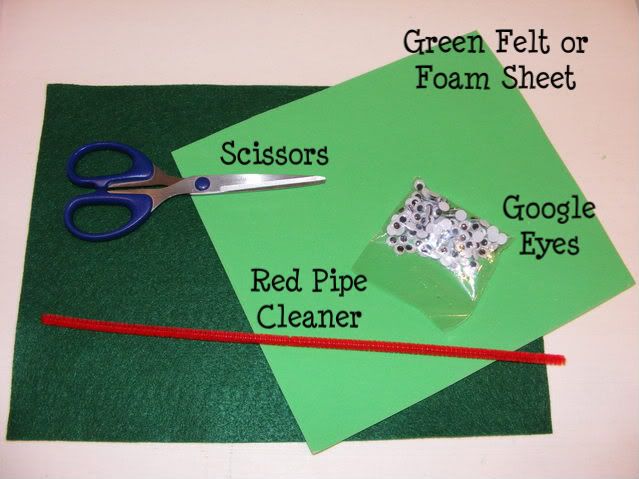
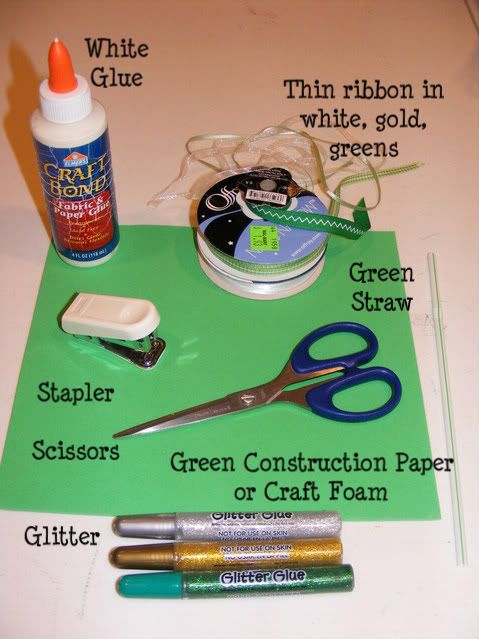
      Products Needed:
      Instructions:
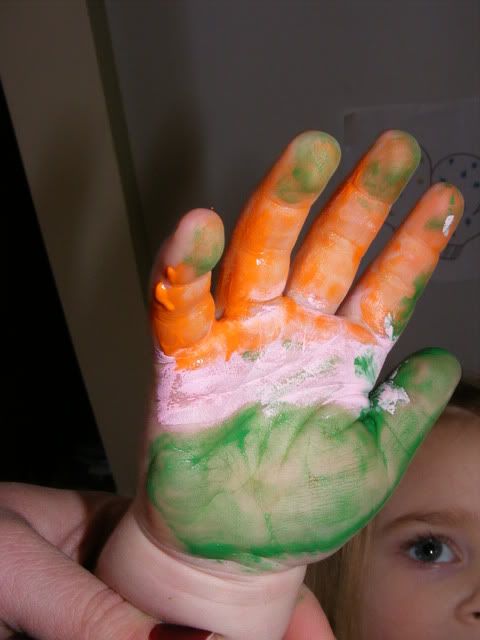
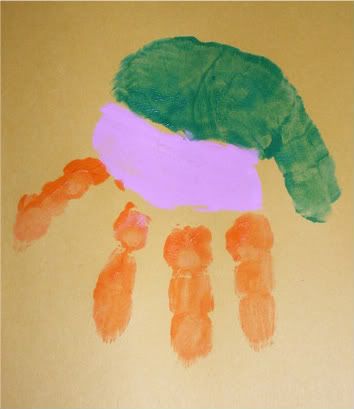
      1) Paint the fingers of one hand orange for the beard. Paint a strip of pink or peach for the face, and paint the thumb and rest of the hand green to make the hand of a leprechaun.


      (try to ignore my daughter's green fingertips- this was after we had stamped her hand and she quickly drew her fingers into a fist!)
      2) Print the hand on the card with the hand facing downward. Let the card dry. 3) Glue a pair of google-eyes and a pink pompom nose on the pink/peach face of your leprechaun. Glue the orange pompom onto the tip of the thumb so it looks like he is wearing a stocking cap.

      4) Write a greeting on your paper or you can do this project on a folded sheet of paper (and put the greeting inside) to make a card for a friend/family member.

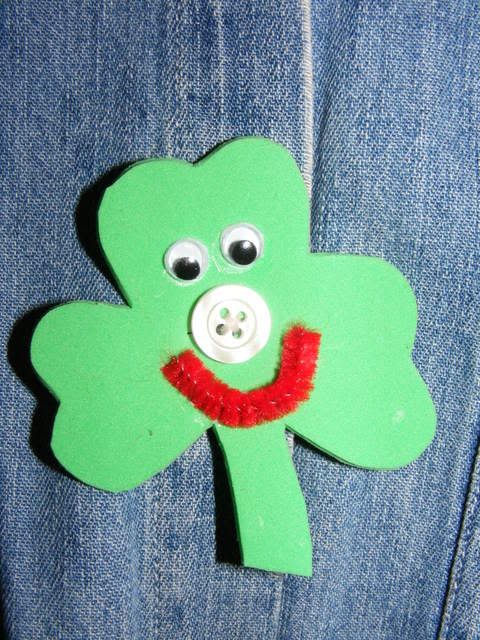
      Button-Nosed Shamrock Friend

      Products Needed:
      Instructions:

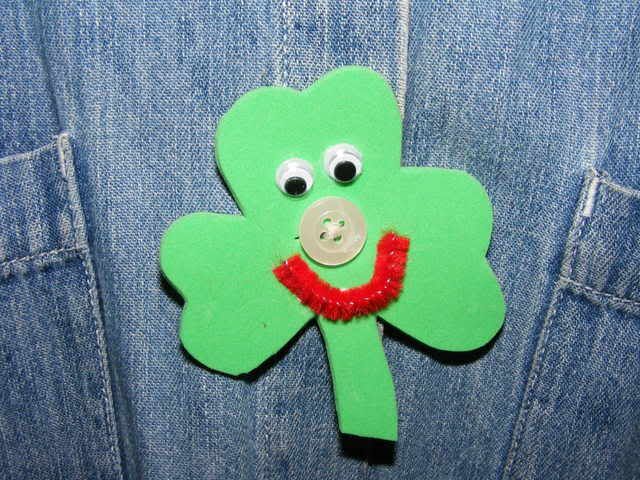
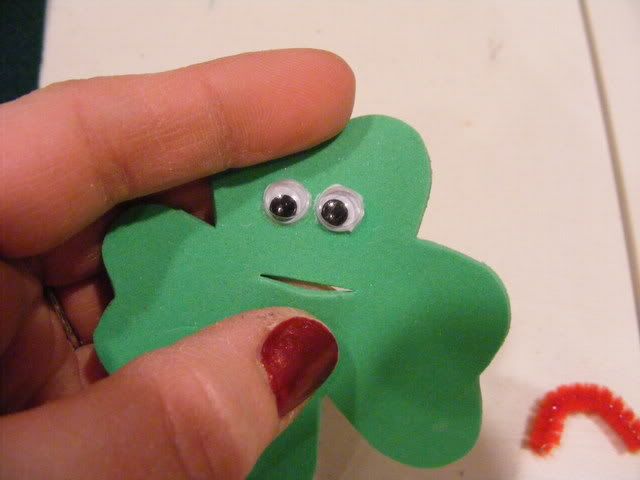
      1) Cut a small shamrock from a piece of green felt or craft foam. Cut a 1/2-inch slit along the center of the shamrock for a button hole. (See picture below)

      2) Glue two google-eyes to the Shamrock.

      3) Cut a 1-inch piece of red pipe cleaner and bend it to form a smile. Glue it to the shamrock below the slit.
      This little guy's nose will depend on the kind of button you are wearing! This would make a very cute, easy gift to make for teachers of classmates!

      Lucky Penny Necklace

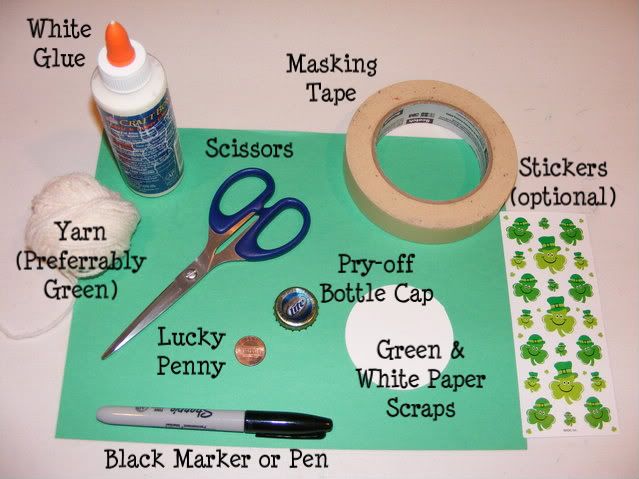
      Products Needed:
      Instructions:

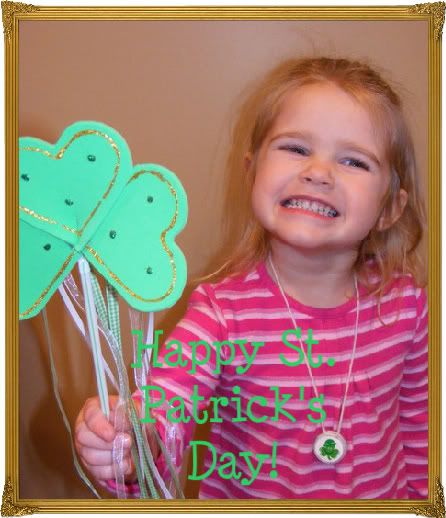
      1) Cut a circle from the white paper, just big enough to cover the outside (top) of the bottle cap. Put a piece of masking tape on the outside of the cap to make a better gluing surface. Glue the white surface to the cap.

      2) Cut a shamrock from the green paper small enough to fit on your white circle-- or you can put a shamrock sticker on, as I have.

      3) Turn over the cap and put a piece of masking tape on the inside of the cap. Put another piece on the penny, and then glue the penny inside the cap. Let dry.


      4) Cut a piece of green yarn as long as you want your necklace to be. Rub glue around the outside of the cap and tie the yarn around the cap. Then tie the two ends of the yarn together to make a necklace.


      I chose to continue wrapping the yarn around to cover the entire outside edge of the bottle cap.
      *Note that I used white yarn. This necklace would look better with green yarn but I didn't have any; I'm for using what you have! If you can't find a bottle cap, use a water bottle cap or another tiny round trinket.

      Your little Irish lad or lass will love wearing their lucky penny hidden behind their shamrock necklace!
      *Note: since the penny could come off, posing a potential choking hazard, this project is not safe for children under 3 years of age.


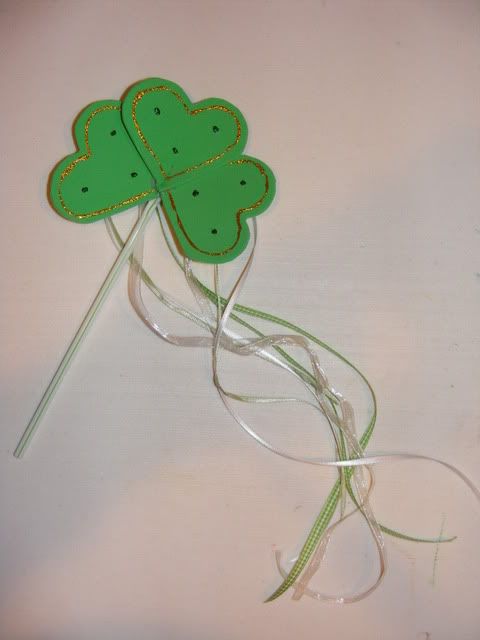
      Shamrock "Magic" Wand

      Products Needed:
      Instructions:

      1) Cut three heart shapes out of the green paper or craft foam. If you don't feel confident to draw three hearts freehand, you can trace a cookie cutter.
      2) Decorate your hearts with glitter, stickers, and other fun decorations.
      3) Glue the tips of the three hearts together to form a shamrock. Let the glue dry. Staple the center of the shamrock to one end of the straw to make a handle.

      4) Cut three or more 3-foot long ribbons. Hold them together and staple them to the back of the shamrock so the ends hang down from the shamrock wand.


      Do you think your Magic wand will help you catch a leprechaun?


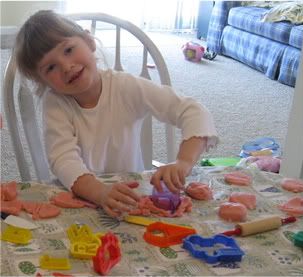
      Homemade Play-Dough
      This is a great time to make some GREEN dough for your little ones to play with on a rainy March day.

      Ingredients:
      1/2 cup salt
      2 scant cups of water
      2 TBSP oil (canola, vegetable, or other)
      2 cups of flour
      3 TBSP Alum powder (you can find it at bulk stores or in with spices/flour)
      Food coloring

      Directions:
      1) Boil water and salt until the salt is not grainy. Add oil and food coloring.

      2) In a bowl, combine flour and Alum. Add the liquid to the flour mixture.

      3) Stir well, form into a ball and knead well.

      Dough will keep for a few months if stored inside a plastic bag in a covered container. This recipe makes enough dough for a few children to play at once.

      Many of us think of the Shamrock when we think of St. Patrick's Day, but do you know why?


      Saint Patrick's name was actually Maewyn Succat; He was born in Scotland around 400 A.D. When he was 16 years old he was kidnapped by pirates and taken to Ireland as a slave. During this time he prayed much and his faith began to grow. He escaped 6 years later and became a preist, and felt the Lord was calling him back to Ireland, where he had been a slave. Irish people at that time did not believe in God. Patrick lived and preached for 40 years, converting Ireland to Christianity, and becoming a bishop. Legend credits him for driving the snakes out of Ireland; Many pagan religions worshipped serpents so the legend is probably symbolic of him driving pagan religions out of Ireland. He is also credited with teaching the Irish about the concept of the Trinity by showing people the Shamrock, a 3-leaved clover, using it to highlight the Christian belief of three divine persons in the one. It wasn't until after his death that he was deemed a Saint. March 17th, known as St. Patrick's Day, is believed to be his death date.

      If you would like to use the Shamrock to teach your children about the Trinity, like St. Patrick did, this site has a few easy crafts to print out: http://www.christianpreschoolprintables.com/StPatricksDay.html


      Irish Munchies

      If you get hungry while you're crafting, here are a few green St. Patrick's day goodies you might like to try:

      Magically Delicious Drink

      Use Sprite, 7Up or ginger ale, green ice cubes. Pour each child one cup of Sprite, 7Up or ginger ale. Add green ice cubes. As the ice cubes begin to melt, the drink will magically change colors.


      Leprechaun Dust

      Ingredients: 1 box jello instant pistachio pudding, one baby food jar with lid for each child, spoons, milk

      Directions: Place one tablespoon of leprechaun dust (pudding powder) in each jaradd 1/4 cup milk place cap on jar and have your little leprechauns shake away adding the milk makes the instant pudding turn green


      Easy Shamrock Cookies

      Ingredients: Refrigerated sugar cookie dough, green food coloring

      Directions: Put dough in a ziplock bag with a few drops of green food coloring. Let your children squish it around until all the food coloring is blended. Refridgerate for 20 minutes or so (because their little hands warm up the dough too much). Roll it out and use a large shamrock cookie cutter to cut out cookies- bake as directed!


      Shamrock Jell-O Jigglers

      Ingredients:1-1/2 cups boiling water and 1 pkg. (8-serving size) JELL-O Gelatin, any flavor (of course we use green lime flavor!)

      Directions: Stir boiling water into powdered gelatin for at least 3 minutes until well dissolved. Pour into an 8x8 glass pan and refridgerate 3 hours or until firm. Dip pan in warm water for 10 seconds to make the jigglers come out of the pan easier. Cut your jigglers out with a Shamrock cookie cutter for a perfect Irish JELL-O treat.


      For more St. Patty's day fun, check out these websites:


      http://familyfun.go.com/stpatricks/

      http://www.dltk-holidays.com/patrick/

      http://www.enchantedlearning.com/crafts/stpatrick/

      http://crafts.kaboose.com/holidays/st-patricks-day/


      May your blessings outnumber

      The shamrocks that grow

      And may trouble avoid you

      Wherever you go.